

Fairey Gannet AEW.3 - Sword 1/72
 1February 6, 2021I let fate decide and rolled the virtual dice... The first number was just an after market set in my scalemates stash. The second number was en Emhar F-94C which I had buit before...but the third numer was...
 2February 6, 2021...my new project!
 3February 6, 2021After reading some articles from fellow modellers who have already tackled this kit my "to do" list for improvements/corrections had grown quite long.
 4February 14, 2021I acquired this CMK set to add some more "substance" to the display which I plan to build once the Gannet is finished. I looks like these starter pods could be hung under the wing to carry it with the plane.
 5February 14, 2021Different pencils were used to add texture to the cockpit. Some are dedicated "weathering pencils" for scale modelling, others are artist's watercolor pencils. I found that the Supracolor II Soft series from Caran d'Ache works quite well.
 6February 20, 2021The white stripes mark the most important instruments. It took me quite some time to cut such tiny decals from some white decal paper and apply them. But I think they are a nice and important feature for my Gannet's cockpit.
 7February 20, 2021The radar operators' compartment doesn't seem to be too cosy.
 8February 21, 2021The doors of the operator's compartment were cut out - or rather drilled out. The kit offers replacement resin doors to show them opened up.
 9February 21, 2021As the fuselage's thickness looks a bit too much the inside area around the new door holes was thinned down.
 10February 21, 2021I want to show the access ladder deployed. Sword shows the location of it with nice engravings which made it easy to open it up, too.
 11February 28, 2021On the right I have already started to open up the numerous air scoops which are placed all over the Gannet's fuselage. It must have been like: "We need cooling for this electronic device? Just drill a hole and add another air scoop!" Anyway, opened up they will look much better.
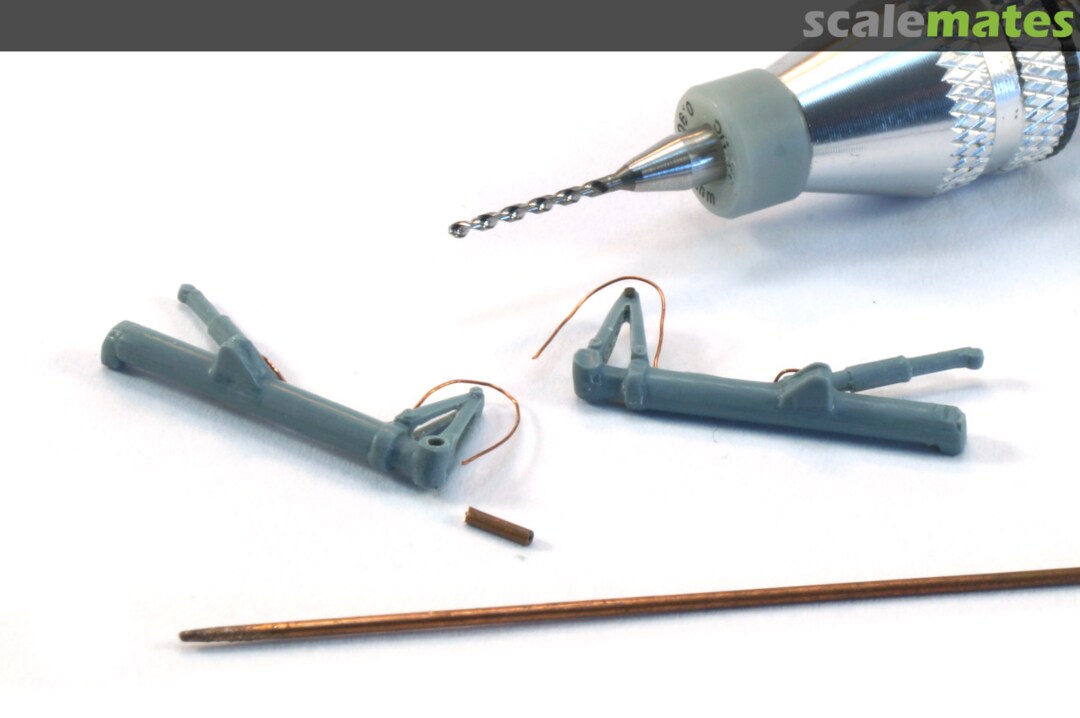
 12February 28, 2021The front landing gear whell received some extra plumbing and other detail. The same is true for the leg itself. Here I spent most of the time opening up the solid-cast torque arms.
 13March 13, 2021Front landing gear installed in one side of the fuselage.
 14March 13, 2021The fuselage is ready to be closed. Some careful dry fitting and sanding was needed to avoid any large gaps between the fuselage halves. Nose weight will be added later.
 15March 13, 2021The seams will definitely need some more filling and sanding...
 16March 13, 2021The stabilizers on the horizontal tail needed some filling.
 17March 21, 2021Sword doesn't provide any axle on the main land gear legs. These were made from some copper wire. I also added some wiring.
 18March 21, 2021The wheel bays look very busy with tubes and wires in walk around photos. I tried to recreate this look - at least to some extent.
 19March 21, 2021More than 20g were added to the models nose to prevent it from being a tail sitter. All air intakes in the front part were opened up. The engine blades were only indicated on the original part, so I cut them out.
 20March 21, 2021The exhausts are a bit tricky to assemble and need some filling and sanding. Some more tubes were added to the sidewalls of the main landing gear bays.
 21April 3, 2021This should be enough extra detail for the wheel bays.
 22April 3, 2021One wheel bay has been painted with Model Air 049 Medium Sea Grey - close enough to represent the Medium Grey that's visible in walk around photos. After a gloss clear cote (Future) I applied a grey wash made from black and white ooil colours.
 23April 3, 2021The openings for the landing lights were revetted with thin plastic sheet which was sanded to follow the form of the wing's leading edge.
 24April 3, 2021The position lights were cut out and some clear sprue added. I had previously bored a small hole in it and filled it with paint to represent the light.
 25April 3, 2021For the transparent landing light covers I'm using the kit parts. They need some sanding to fit (due to the plastic sheet that was added) and I drilled a hole and filled it with silver colour - that's the landing light.
 26April 10, 2021Attaching the wings is a bit tricky. I used slowly bonding glue (Revell Contacta). The second wing was only glued in place when the first wing was already completely set. Checking pictures and drawings helped with getting the angle right.
 27April 10, 2021Some gaps needed to be filled. Nothing unexpected though.
 28April 10, 2021The Gannet is getting in shape!
 29April 10, 2021On the left: the original canopy from the kit. On the right: a vac-formed canopy from Sword's set "DSW 7201 Fairey Gannet AEW3 operator's cockpit". It was cut out with a fresh blade and after taking the photo I cut it in order to show it opened. The frustrating part: My version of Sword's kit already included the resin parts for the operator's cockpit. But Sword did not supply the vac formed canopy. So I had to buy the whole set DSW 7201 to get those clear parts - and all the nice resin parts from the set are now left.
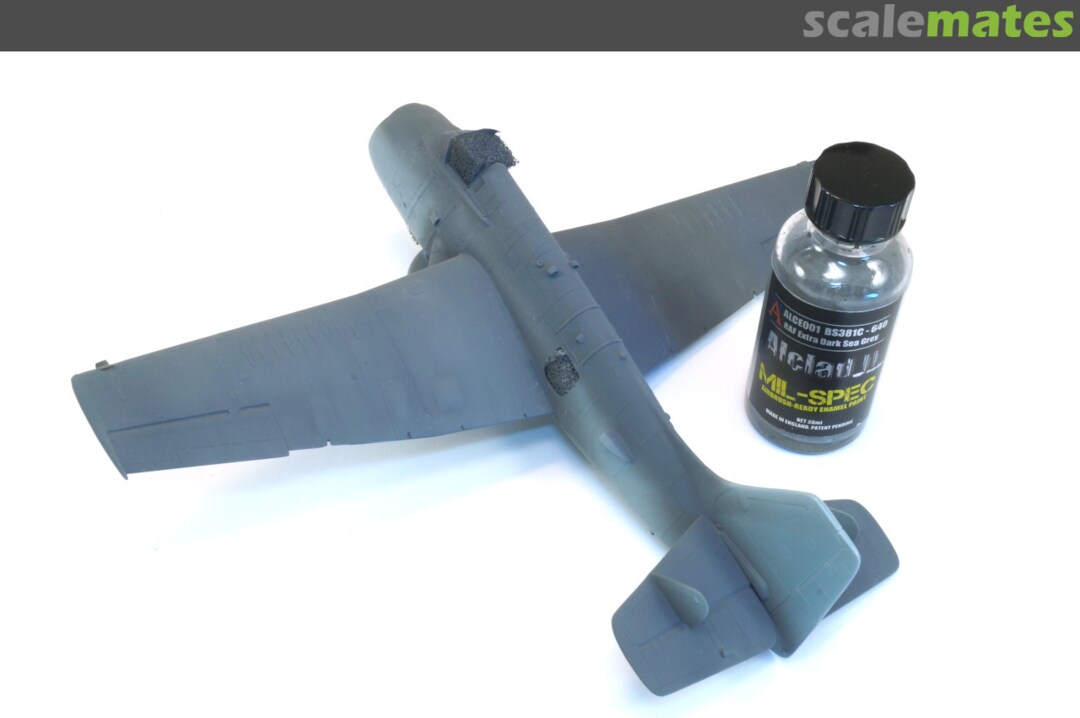
 30May 1, 2021There are lots of discussions online about what is the correct Extra Dark Sea Grey. I thought leave it to the British and opted for Alclad II's MIL-Spec colour. Despite being the darker colour I sprayed the Extra Dark Sea Grey first as I thought this to be easier for masking.
 31May 1, 2021Still, masking was a tedious job. But the flexible masking tape I bought some time ago really helped with the curves.
 32May 8, 2021The main paintjob is done! I had to touch up some overspray here and there but nothing serious. For the Sky colour I used "AK2015 SKY" from AK Interactive.
 33May 8, 2021
 34May 22, 2021The decals are very thin and need to be slided off the paper directly on the model. The de-icing areas were recreated with black decal stripes. I found that it's always good to have an assortment of black, white and yellow decal stripes in various thicknesses.
 35June 12, 2021So this happens when your mind is somewhere else while applying decals - and when the decal soft and the ultra thin cement bottles look exactly alike but their colour. First I thought "Damn, that decal soft is strong today" Then I realized that it wasn't decal soft eating its way through my roundel and the underlying colour coat. Luckily I had only applied the cement to the white area of the roundel so it was still fixable.
 36June 12, 2021A grey (black + white) oil wash brought the model's surface to life.
 37June 27, 2021Caran d'Ache pencils "Supracolor II Soft" were used to highlight any protruding structures and egdes.
 38June 27, 2021For the first time I used a "Pin Flow" tool to apply ultra thin plastic cement - in this case when gluing the landing gear in place.
 39June 27, 2021Only a few small parts and the propeller are still missing. The somewhat complicated aerial wire will be added at the very end.
 40June 27, 2021The landing gear received some extra attention - as did the landing gear bays before.
 41July 4, 2021Some last bits and pieces were added...
 42July 4, 2021...I almost forgot the boarding ladder that I had planned earlier (see photo #10). This was scratched from some leftover plastic parts of another kit and some wire (copper and lead).
 43July 4, 2021The final step was the notable aerial cable which put my patience to the test one more time. I needed to drill some holes in "delicate" places - no small feat when the model is actually finished and you don't want to ruin it by slipping with the hand drill 😄 But it all worked out in the end.
 44July 4, 2021Originally I had planned the show both propellers in an "+"-position as this can be seen in photos quite a lot. Probably ground crews turned them in this position for easy access (as they did with the Shackleton's propellers, too). However, one blade of the rear propeller was 2mm shorter than the rest, which really looked odd in the "+"-position compared with the longer blade of the front propeller. Perhaps this is also the reason why all built Sword Gannets that I have found on the net have the propellers the way I positioned them now, too.
 45July 4, 2021
 46July 4, 2021
 47July 5, 20218 € worth of resin for the "Palouste" - which is Finnish and means "firewood". A pretty good name for a tool which helps to start the engine.
 48July 5, 2021The Palouste is a tailsitter. The only way would have been to drill a big hole from behind and hollow the resin part out. The easier way will be to just glue it to the display base...
 49July 12, 2021
 50July 12, 2021
 51July 12, 2021
 52July 12, 2021
 53July 12, 2021
 54July 12, 2021
 55July 18, 2021I finished a small display base. The tarmac was made out of "Heki dur" which is basically a thin foam board.
 56July 18, 2021Now I'm waiting for a small metal name plate that I ordered online.
 57August 8, 2021The name plate has arrived - and the project is finished!






Comments
22 July 2026, 07:34 -


